Showing posts with label Random Crafts. Show all posts

Thursday, August 8, 2013

Well, I slept all day, got up and ready for work, drank a whole lotta Dr Pepper, drove all the way to work, parked in my parking spot.  And right on queue, my supervisor called to tell me that since I was the over time person tonight, they didn't need me and I was cancelled.


Man, oh man.  Great timing.  That moment when you REALLY need that extra income!!!

Oh well.

I went on home, picked up handsome husband and cute baby, and we went and had dinner at our favorite restaurant.  Then we watched Big Brother, gave cute baby a bath, clipped some doggy fingernails, and I tucked everyone in to bed!

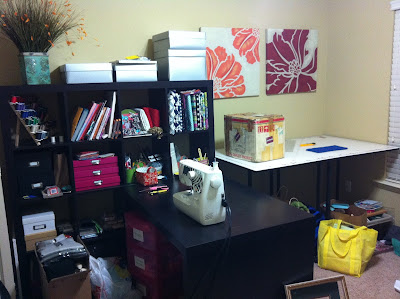
Now I'm in the craft room!!

Messy Room!!

I've got a couple things to finish up for a swap I'm doing right now.


And then I'm going to start on some new curtains for the bedroom!!


I've had the fabric for quite a while, but I've just been too busy!!


Hope everyone has a great night!


Suzanne.

Tuesday, June 25, 2013

They're here! They're here!

My tags are here!!


Check out Jennifer's Jewels on Etsy to get your very own!

Wednesday, June 5, 2013

Alright, y'all.  Its the middle of [most people's] the week! I'm currently in the middle of my weekend, but hey, if you aren't cool enough to only work Friday, Saturday, and Sunday like me, then you can just envy my 5 AM Wednesday craft morning.

When I woke up this morning at four am (starting to see a pattern emerging on my days off...) I started thinking about knitting.  Know why? Because I checked the temperature outside and here in lovely Central Arkansas it is a balmy 68 degrees at this time of morning.  LOVE IT.  No, seriously, I do.  But for some reason the warmth made me think about all of my fancy-shmancy knitting projects that are halfway (or not quite even) done just sitting in my craft room taking up space.

So, for this WIP (work in progress) Wednesday, I decided to photograph all of the projects that were out in the open and share with you!  I say that because I have no doubt that I'm hiding some more.  Actually, I just looked down and saw another basket with a blanket in it that didn't get it's picture taken this morning.

So, without further ado, lets get this show on the road!

I bought this wonderful Jewel Hand Dyed yarn at the Cascade Trunk Show at The Yarn Mart during the fall.  The pattern is a free download from the Cascade website.


Last summer, at The Yarn Mart, I took a sock knitting class!  I have always wanted to learn how to make socks.  We used the book Toe-Up 2 At A Time book.  I had so much fun learning how to make them!  I am using Shibui sock yarn.  I actually would pay to take the class again because I'm pretty sure I've forgotten how to do it...and I want to finish these socks off!


This is a random, not baby-friendly-at-all baby blanket that I started when I found out I was pregnant. I'm using Bamboucle (which is actually 45% cotton, 30% bamboo, 17% linen, and 8% nylon, so it actually is fairly baby friendly).  I didn't have a pattern, I just started winging it.  It was all B1G1 free in the adoption center at The Yarn Mart, so without having a plan...I bought it ALL!


This is actually is a baby blanket pattern that I've used for baby shower gifts in the past.  This particular blanket is adult-sized that I made for one of my very best friends, Sara, when she suffered from two strokes last January.  She is fully recovered a year and a half later, and I still am hoarding her blanket!  Only thing left to do on this one is to sew the fabric on one side. 


I am SO bound and determined to pick this bag back up.  It is from Sara over at Sans Limites Crochet and it is something called "Tapestry crochet" where you work the yarn just a little bit differently to create some awesome patterns.  She has lots of different ideas and tips over on her blog on how to accomplish.  I bought this pattern at her Ravelry store.


Here is another unfriendly-baby baby blanket.  I got the yarn (Elsebeth Lavold Silky Wool) from the adoption center at The Yarn Mart.  It is beautiful yarn, but is 45% wool, 35% silk, and 20% nylon.  Not the most comfy cozy, or spitup-proof yarn out there, that is for sure.  I have no clue what the pattern is called...I actually have a random orange sticky note in the bag with the yarn that has the basic premise to the blanket scribbled on it.  I started it when I first got pregnant, and it hasn't gotten very far!!


This yummy cowl has been in the works for two years.  I got it to make something nice and warm to make on those cold football talegate mornings (Go Hogs!).  I got the yarn from The Yarn Mart, and it is Berrocco Vintage Chunky, and Shibui Staccato.  The pattern is free from the Shibui Knits website, and is called Array


Here is a random little football-themed hat for the little bug-a-boo.  Only thing left to do on this one is weave in the ends (I HATE doing that! So many hates just hanging around with loose ends) and sew on the "laces." Didn't follow a pattern on this one, just did a basic crochet hat with some color changes to mimic a football! The yarn is Caron Simply Soft.


Another hat from Sara over at Sans Limites Crochet.  I bought the Encore yarn at The Yarn Mart and the pattern can be found on her Ravelry page.  


Wow....this blanket has been in the works since....must I say it.....December of 2006!!!  Holy cow.  I don't think I'll ever finish is. I'm using Caron Simply Soft and the pattern is called the Alexi Throw.  The problem with this is the cabling takes forever!  It takes me about 30 minutes to do one row.  I get bored, it gets put back in it's basket.  


Here is another beauty from Sara over at Sans Limites Crochet.  I have made this checkerboard beanie more times than I can count.  Definitely one of my favorite hat patterns.  Yarn is Caron Simply Soft.  


This beautiful shawlette is named Trillian.  It is named after a character in Douglass Adams' wonderful book The Hitchikers Guide to the Galaxy which happens to be one of my favorite books.  I am making it with some type of sock yarn...not quite sure what. I know that I got in on sale in the adoption center at The Yarn Mart.  I have been wanting to learn how to do continental knitting, and this is my first attempt.  However, I didn't decide to learn until about halfway through what you see pictured, so the tension in the yarn is WAY off.  


This is a pattern by Anna and Heidi Pickles and is called the baggy-weave sweater.  I got the yarn at The Yarn Mart and it is one of my favorites, Vintage Chunky by Berrocco.  Such soft, yummy yarn!  I think the problem with this is I have no clue where I left off, and don't know where in the pattern to pick back up!


Well, that is about it. I never did go back and photograph the other blanket that is in progress (it is a peach and brown checkerboard blanket that I am crocheting).  I figured it would be pretty pathetic to have FOURTEEN works in progress.  Like 13 isn't embarrassing....but I'm going with it.

I hope that you do not have as many WIP as I do!

I think my problem is that I get SOO excited about new yarn, and new patterns, that I just jump right in without thinking.  I get board, find a new pattern, and the cycle starts over.

I suppose I should use this energy to go pick something up and start knitting!!!  Although, it is now time to get the baby up and feed him!

Happy Wednesday, y'all!

-Suzanne

Wednesday, January 9, 2013

I finally have finished up a project in my 'dining room' that I started so long ago!  I was browsing on pinterest and found this wonderful tutorial on how to make letters using nails and embroidery floss (check it out! jk jk).  I absolutely love the way that mine turned out, and have had many compliments from friends who have come over for dinner.


I used my cricut to cut out letters in a font that I liked and then taped them to the wall.  After that I nailed around the letters, and then wrapped about 6 times in the embroidery thread!  Super great project and it really turns out nice!
Ok.  Crafting with a newborn is sort of a bitter sweet experience.  It is really sweet because, as you know if you have had a newborn, they sleep ALL the time.  Apparently they sleep for about 20 hours out of the 24 hour period.  That is potentially a lot of time to get things done (though they don't tell you how tired you are going to be all the time, especially if you are breastfeeding and your body is in overdrive to be a milk machine).  The bitter part isn't really bitter, but the problem is if you get started on a big crafting project while baby is sleeping, baby will eventually wake up and you have to stop said project and go get elbow deep in dirty diapers and then feed them again!!

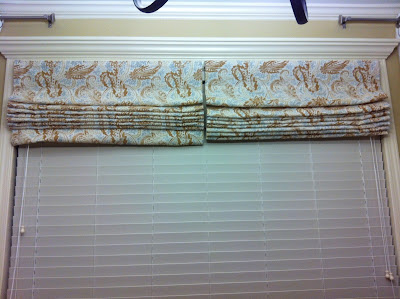
Well, that is what happened when I decided to make some roman shades for my kitchen window.  For almost a year now, my husband has complained bugged pestered (oh heck there isn't a nice word) me about my decorative curtains.  They are two panels that I got from Ikea, but I put them on 2 foot curtain rods so they would just frame the window.  Well, I haven't really noticed as much, but my darling husband doesn't like that the TV in the living room has a horrible glare from the window in the kitchen, and he can't fix it because of my *stupid* decorative curtains!  I wasn't going to get rid of my curtains because I love the way they look, so I started looking for a different way to fix the problem.

I started searching for some roman shades because that seemed like the most logical choice.  Do you know how expensive custom roman shades are?  I don't even want to talk about it.  Luckily we live in the land of technology so I went out in to the blog world to see if it was even possible to make it a DIY project.  Here are a few of the tutorials that I read through.  I didn't follow any one completely, but I learned a lot from reading different blogs and finding out which steps were going to work for my project.  Check out these blogs to see what the other ladies did, all of the projects turned out great!!

Beneath My Heart
Brown Paper Packages
Park House Love

A couple months back my mom and I were at target and I found some absolutely adorable place mats that I purchased to go on the kitchen table.  When I went to target to pick up my mini blinds for the project, I happened to walk past the clearance section and guess what I found?!  There were giant table cloths of the same fabric as my place mats on clearance for $8 each.  Okay, you can't find that much fabric in the fabric store for that price!!  I snatched up two of them and headed on home!!

The first roman shade took quite a while because I wasn't exactly sure what I was doing, and I had to allow for glue drying time and poopy diaper changing time.  However, it turned out awesome! I absolutely loved it.  But life happened and it was a couple of days (okay maybe more like a week) before I started on the second shade.  I measured and cut and got everything finished.  And then I hung my second shade up next to the first one.  Well.  You know that saying, "measure twice, cut once?"  That definitely applies to gluing mini blinds on fabric too.  Unfortunately the slats are about 1 inch off of each other.  That hardly matters when I have the blinds down.  Only a crafty person who is looking for it would notice.


 But when you pull the shades up.........


The shades on the right of the picture are the shades I finished first, and the ones on the left I finished last night.  I was very sad when I pulled them up and they have that cute little mess up.....see it?  Pretty awful, huh?  That is because of the inch difference in where I placed the mini blinds.  My sweet husband says they look fine, but I have a feeling I am going to be figuring out how to un-glue the blinds from my fabric and trying again.  I am seriously hoping that it doesn't ruin the fabric, because I can't get anymore!

Ever had a project turn out like this?


Frustrating!!!! Wish me luck!

Monday, September 24, 2012

And all through the house....

Not a creature was stirring....

Except for two giant pups......

A pregnant momma.....

And a Cooper baby in a tummy!!


Well, tomorrow I start my third trimester!  It has been quite the journey, I don't think I ever expected there for be as many ups and downs as there have been.

It is weird that in 12 short weeks I should be meeting my lil' man!

Cravings? Sweets.  Man oh man.  And fruit.  Can't get enough fruit!  Today I made a combo of the two....I made some apple muffins with melted cinnamon sugar on top!  Holy cow.  Deelish.  Let me show you the yummy picture!

Recipe
Also, tonight I decided to just bite the bullet, sit down, and finish the bumper pads for Cooper's crib.  I think they turned out pretty adorable, if I do say so myself!


Check back for a bump picture, probably on Wednesday!

Monday, August 27, 2012

65 seconds.  Doesn't seem like a very long time, huh?  Just a blink of an eye.

Except when your uterus is contracting during this cute little thing called Braxton Hicks.

And they can leave me alone!!

This week brings the joys of runs of Braxton Hicks contractions.  Sometimes at work, sometimes in the middle of the night.

But really, that is the only bad symptom (besides occasional vomiting and continual acid reflux) that I seem to be having now!

This is a super duper major improvement on all of my previous weeks of pregnancy! Go team.

Here is a picture of cute little baby boy!  He is growing, moving, and grooving!!


Excuse the face.  This is what it looks like when you only sleep for two hours.  I hate Sunday nights/Monday mornings and cant sleep knowing Tim is going to be leaving.  But he is in his 5th week.  Including this one, we only have 8 weeks left before he is home full time!  Can't wait to have my handsome firefighter home! We've got a baby to prepare for :)

Speaking of preparing, the nursery is making lots of progress!!

Last week my parents were awesome enough to come over and help me paint.  Even though I got low odor/low VOC paint, it was still really strong smelling in there and I had to take a LOT of breaks.  But it is all painted and looking great!!

I also got the crib all put together to surprise Tim when he got home this past weekend.  I wanted him to get an idea of what it will look like all finished!

Look who else thinks the crib is awesome...


Macy!  She loves being in the nursery!  Since we moved in to the house over a year ago, she has never been in the room (it has been used as a catch all for things we didn't unpack...).  Cruz also spent some time in the nursery and did great!  We are trying to get them used to all of the new baby items and teaching them they aren't toys.

Another thing that happened was on Sunday we got the new recliner for the nursery!!  I debated a long time about what kind of chair to get.  Do we get a rocker? glider? etc.  We decided to go with a brand new recliner.  Since we plan to have baby sleep in his own room from day one, I knew we were going to need a nice place to sit during late night feedings.  This one ended up being perfect!


This is called the Wyatt Glider/Recliner, and we got it from Haverty's in Little Rock.  It is so comfy, both Tim and I love it!!

See those little pillows?  Yupp, I stitched those up the other night!  I loved the fabric, and only having 1/2 yard of it ended up being the perfect amount to make these two.  A long time ago I picked up some pillows from Good Will that happened to be on sale for $1 each.  They had old retro ruffled pink covers on them, but I knew the forms inside had to be in great shape.  Totally worth it!

Today I had lunch with my In-laws, and after headed over to Hobby Lobby to get a little bit of Minky fabric.  Have you ever tried to cut/measure/sew with minky??  Man, let me tell you, I won't be doing it again.  But, I did take about an hour to make this cute cotton and minky blanket for baby!


So, remember the inspiration picture I shared last week?  See the colors starting to come together?  See the yellow and the navy blue?  It is such a fun color combination!!  The navy really helps make the yellow on the walls pop.

This afternoon I worked on making all of the ties to go in the corners of the bumpers.  So those are done and ready to be sewn on!  I've got to measure and cut all of the fabric for the bumpers and I will get sewing.  I'm trying to get those done, because the fabric for the curtains should be delivered to my house tomorrow.

I will keep posting pictures as things get checked off my to-do list!  Stay tuned!

Thursday, August 23, 2012

So, you know I must be feeling better for a few reasons.

1.  I am working on my nursery.

2.  I am posting on my blog.

3.  I am getting around to trying all of the awesome Pinterest ideas I've been pinning over the past 5.5 months.

Well, last night I wanted to get going on some laundry.  It seems never ending.  (Isn't that such a silly statement.  Obviously it is never ending. Even if you are doing laundry, you are [probably] wearing clothes that will need to be washed too!!)  I have a couple of blankets that have been sitting on the floor of my laundry room waiting to be washed and put away since....oh....the beginning of the summer.  Lets face it, who needs blankets in this crazy Arkansas summer heat!  So last night was the night.  Until I went to get started and had barely enough detergent for one wash.

Poop.

We have one of those awesome new HE front load washers, and I absolutely love it and wouldn't change it. But man, is that detergent expensive.  A while ago, a trend started of making your own detergent, both powdered and liquid.  Everyone was claiming that just a little bit of extra work and mixing, and you would have detergent for a year for a fraction of the price of buying pre-made detergent.

All of the recipes I have seen use pretty much the same ingredients:
1.  Borax
2.  Baking Soda
3.  Washing Soda
4.  Fels Naptha soap

Some people add a fabric softener, others add oxyclean or other products.

I had pinned a recipe that I thought would work best for me, and have just been waiting for the time to make it.  You can find the recipe I used  here. 

So, off I headed to Walmart to pick up everything I needed.  Here is the price breakdown for what I bought:
1.  5 gallon pail 2.58
2.  4 lb box of Borax 3.38
3.  4 lb box Baking Soda 2.12
4.  3 lb box Super Washing Soda 3.24
5.  [4] 5.5 oz bars Fels Naptha soap $0.97/each
6.  Oxyclean $7.52
7.  [2] 55 oz Purex Crystals Fabric Softener $8.96/each

That adds up to $31.68 (including the five gallon pail which will not need to be purchased next time I need to make a batch, and this number is pre-tax of course.  That will obviously vary depending on where you live).

Okay, the cool part? You only need 1-2 TABLESPOONS per load, depending on load size and amount of soil.  So, if you did approximately 6 loads of laundry every week, this recipe will last you for an entire year!  I mean, come on, does it get better than paying only $31.68 for a WHOLE YEAR of laundry?  If you have an HE washer like me, you were probably used to paying between $10-15 every few months depending on the type of detergent and size of the bottle you were buying.

So, does it work? Does it dissolve? Does it leave spots?

YES, YES, and NO!!

My front load washer has a tray that you pull out where you put the detergent in.  There is a cup in there that says it is for liquid detergent, and in that cup it says "remove for powdered detergent."  So if you are curious if you can put powder in your HE front loader, just look!  I've done two loads, and haven't had any issues with the soap not dissolving, and I don't use hot water.  No spots are leftover either!!  I added two bottles of the Purex crystals, and it seems to be enough scent for me.  I'm a sucker for lavender scent!  However you can add less or none if you prefer or have allergies to scents.

The awesome person who posted the recipe that I followed used the empty Purex Crystals bottle to store smaller amounts of the soap in her laundry room so she wouldn't have to work out of the big 5 gal pail.  I thought that was absolutely brilliant, so I tried it out!

Photo Credit

Pretty cute way to store it, huh?

Okay well I had a few issues with that.  When I grated my Fels Naptha soap, I used my food processor.  My soap was more the thickness of shredded cheddar cheese instead of the consistency of say..... parmigiana regiana (is that how you even spell it??).   The point is my soap cheese was thicker. It doesn't seem to affect the dissolving ability, but it doesn't want to come out of the top of that cute little bottle!!  Luckily I had saved the carton that the Oxyclean came in and am using that instead.

Next time I make the detergent I will do one of two things:
1.  Find already powdered Fels Naptha soap (or zote soap if I can find it)
2.  Microwave the bar of soap so that it will crumble and become much finer when put in the food processor

But, I won't have to make it until next year hopefully!!  Granted, with the baby coming soon I think laundry loads might go up for a bit.  Apparently they drool and puke and poop a lot.  Who would have thunk it.


Anyways, I highly suggest that you go and try this out!! I mean, who doesn't like saving money where you can!!  If you do, let me know how it goes for you!
Tuesday, August 21, 2012

Another week has come and gone.  I really do wish that I could say they are going by quickly.  SO many women talk about how quickly their pregnancies go and how much they wish they could be pregnant again.  I'm not sure I'll ever get to that point, but I suppose we will see.  This past week was okay, with just a few sick days.  And I got to spend Sunday with Tim which is always amazing.  We went to lunch at our favorite Chinese restaurant (which seems to be starting as a ritual for us while he is home) and took a nap.  We did have a good friend over for dinner and some football that night as well.  

Now, over the past 23 weeks I have basically stayed out of the kitchen.  I suppose when you have an aversion to food in general that is what happens.  So Sunday night I decided that I was going all Suzie Homemaker and was going to make this awesome great dinner for Tim and our friend.  On the menu (besides the chicken Tim was going to grill) was mashed potatoes with gravy, mac n cheese, bread, and some cookies!!

Well let me tell you something.  Cooking isn't like just getting back on a bike after you haven't done it in a while.  I almost had a nervous break down right there in front of my stove.  I cooked the mac n cheese in a too small pot so all the noodles were sticking together.  The mashed potatoes were too lumpy.  The gravy, also being cooked in a too small pot, exploded all over my stove top.  The bread didn't go into the oven until after everything else was cooked, so it wasn't ready to eat until the meal was halfway over.  Tim and friend were so nice and ate what they could handle (I'm pretty sure just to make me feel better).

Now.  The COOKIESSSS.  Okay. These turned out SO AWESOME!!!!!! I mean, just take a look at these babies!!


These wonderful gifts to the universe are from a wonderful blogger over at The Bru Crew.  I came upon this recipe by chance on pinterest (because so many wonderful things come from pinterest!!) while I was browsing around one night.  I pinned a long time ago, but haven't made them because I've been so sick!  Well, let me tell you.  If you want a super simple cookie recipe that will THRILL everyone, this is totally it.  Go check out these Peanut Butter Pudding Cookies and I promise you will not be disappointed.  


Well, so Monday morning came way to quickly and before I knew it I was taking Tim back to the fire station so he could carpool down to rookie school.  This is week four, and he is almost done with the EMT portion.  I am SO ready for October to be here so that he can be home for good.  I'm really proud of him though with how hard he is working.  I dropped him off and came back and boohoo'd in bed until about 11.

I got up and played with the pups for a while and then decided that I was going to head to Little Rock to my favorite place, The Yarn Mart, to pick up some new yarn for a fun fall sweater.  As I was leaving I checked my mail, and I had the BEST surprise waiting for me!!!!!

Okay, if you are every as lucky as I am, and you get a package in the mail that has the label Leslie's Art and Sew on it, you will be in for a seriously awesome treat!  I met Leslie through the blog world and craftster.org and actually got to meet her twice at a blogger meet up in Little Rock (even though she lives far away!!).  Well, she had read my last (complaining) blog post and decided to send Baby G a gift!!!  With great anticipation I opened the pretty red packaging with the red heart on it which I have come to associate with something great.  Here is what I found!


Leslie got Baby G his FIRST book, which is a taggie book, and made the softest cutest taggie blanket to go with it!!!  I absolutely love it and I can't wait to let him play with it!!  One thing I want to get a lot of is books for baby, and this is the perfect one to start my collection.  

Thank you SOOOO much Leslie, this is the best gift ever and it made me feel so wonderful!!

After I got some new yarn and hung out with the pups for a while, I headed to my parents house for some dinner.  There is just something about eating one of your favorite childhood meals with your parents that just makes you feel better as a person.  

I am going to skip my actual journal questions this week, because I'm just not feeling it.  No baby bump picture either.  Just know that Baby G is doing great and is very active.  He is also closer and closer to having a name, we just have to narrow it down further!  I'm so very glad that baby is still healthy even though I have been so sick this whole time.  Working at the children's hospital, especially in the neonatal ICU, really gets me freaked out sometimes.  I just know everything is going to happen they way it has always been planned, and I will handle it as it comes.  It is weird to know, though, that if I delivered Baby G this week he would be able to live outside the womb.  Granted it would not be an easy journey and he and a lot of people would have to work very hard.  But lets not think about that.  I vote he stays in a while longer!

Mom is coming over on Wednesday to help me work on the nursery, so hopefully this week I can show you what I have planned! I'm very excited about it, and I know you will all love it!

Monday, January 30, 2012

Whew!! What a month!! Sorry I have not posted lately, I have been pretty busy crafting, working, dieting, exercising, dancing, and many other things!

So, I have just finished up my first month at Craftster! I would love for you to check out the items that I was sent by the beautiful Leslie and then I will show you the items that I sent her!

This particular swap included the pattern for a morsbag, which is a "simple" tote.  I put that in quotes because I'm sure for a seasoned seamstress it is, but it was challenging for me who is very new to sewing!  In addition to the morsbag we also included some extras!

Without further ado, here are my beautiful gifts from Leslie!


Here is the morsbag she made me....how perfect!! I LOVE RUFFLES!!!  It also has a zippered pouch sewn in to the inside.  


Leslie also made me this beautiful zippered bag (I've got to learn how to put zippers in!).  I would love to use it for pens in my work bag or for makeup, but it is just so pretty I don't want to mess it up!!


Here are two amazing fabric baskets that she made me.  I am in love.  These are so neato.  We are also *hopefully* having a swap this month that are making these! I need to step up my sewing skills for this one!!


Last but not least.....CHOCOLATE!!!!

How cool.  I just loved being on the receiving end of this gift!!  It took me a lot longer to craft for her...but she finally got her package today in the mail!!  Silly me, I forgot to take pictures before I sent, so I hope she doesn't mind me using her pictures to show off on my blog!


Here are the contents of the package I sent to her!!  You can see the morsbag I made for her! So proud...second bag I have ever made in my life!  I also made her a heating pad from fleece and rice so she can just pop it in the oven for 2 minutes and have soothing moist heat!! I also embossed a few gift tags with some springtime colors to remind her that Spring is coming!


I also knitted her up a pair of finger-less gloves!  I got the pattern from a magazine that my good friend E got me for Christmas!  I loved making them for her because I knew she wasn't a knitter! These were pretty quick to knit up, but they are why I didn't get my package out to her very quickly! 


Since everyone needs a secret 'stache that is only theirs, I got Leslie some Valentines-y chocolates and sent them her way!  


I am SO thankful to Leslie for introducing me to Craftster!!  What an amazing group of crafters from all over the world.  I have just started my next swap which is all about favorite colors.  My partner's favorite color is purple, so I have been making purple items for her!!  I am hoping to finish up and send to her soon, and then I will blog about those!! 

Hope you enjoyed!


Thursday, December 15, 2011

Yarn.  What a beautiful, wonderful material.  I have been enthralled with yarn, knitting, and crocheting for as long as I can remember.  My Great Aunt Mary taught me to knit when I was in fifth or sixth grade.  Shortly after that my [godmother] Mary (in brackets because I don't actually have godparents but if I did Don and Mary would surely be them) taught me how to crochet.  Both skills have stayed with me to this day.  

Here in Arkansas I haven't really found many friends who are too in to crafting.  Most of the women that I find that knit are older than me.  Don't get me wrong, I would love to sit in on some knitting sessions, but I wouldn't want to make anyone uncomfortable when I am the baby in the room.  However, I have been spending a lot of time in a wonderful shop up in the Heights called The Yarn Mart.  It has always been so easy to just pick up cheap yarn from places like Hobby Lobby, Michaels, and even Walmart.  But then I discovered this little slice of heaven right here in Central Arkansas.  

I could seriously spend, and in fact I have, hours and hours of my time just looking and feeling the luxurious yarns they have in their little shop.  I am so grateful that I found them!! 

One thing I love about the shop is their instruction.  If you have any questions about a pattern or a stitch, they are more than welcome to help you in any way.  They also have classes that you can attend, and these wonderful little get-togethers called Knit-a-long's.  Well, the one beginning in January is a sweater knit-a-long and I knew I just had to participate.  They take very few people, so I am SOO thankful that I got my name in quick! It was full within 36 hours!


So, while I was there gathering my supplies for my upcoming sweater project (don't worry, I'll blog ALL about it!), I was speaking with some of the ladies about how they organize their knitting needles.  Believe me, when you start accumulating them, especially circular needles, they end up a huge ball of mess!!  They told me the different ways that they organize them, and showed me a few items they had for sale in the shop.  Here is a great solution that I ended up buying for double points.    


Because I don't have a HUGE stash of needles, I decided to use it as well for my crochet hooks.  One great thing about this is you can organize them by size. A lot of my double points don't have what size they are anywhere on the needle.  Kind of frustrating when you are trying to find the size you need!!  So here is the picture for now, with my dp's and some hooks mixed in as well.  I wanted to use it for my straight needles too, but they are too long!!  Oh well, I will find a solution eventually!


The brand that makes this organizer also has one for circular needles.  Because I think that Tim wouldn't appreciate how much money it cost, I decided to only invest in the dp holder, and attempt a circular holder on my own.  So, here is the down and dirty on my new holder!!  


Take a fabric of your choosing.  This is just cotton fabric that I had left over from my chair rehab project.  Double the length of what you want the end to be because this will be folded over in half.  


Put your right sides together.


I zig-zagged stitched all the way across the open seam.  


Put your hand through the middle, and turn the whole piece inside out.  At this point I would to press the piece.  


At each end, I had unfinished seams that I didn't want showing.  So, I tucked them in on themselves.  


After getting them tucked in, I sewed a straight stitch right across the bottom.  Voila.  Finished edge.  


After that was done, I folded the whole piece in half.  Using the markings on my sewing machine, I lined up the piece and starting making straight stitches all the way across.  I did a few rows at the one inch mark, and then gradually made the spaces bigger for the larger needles I have.  


Here is the finished piece, all you do is slide the circular right through the opening and the needles will hang on either side! 


One great thing about this set up is the hopefully won't get as tangled, and they won't get all kinky from being rolled up tightly!  


 Also, these ChiaoGoo needles are my new addiction for circulars.  I never really liked the metal straight needles so I never tried these, but let me tell you I'm never going back.  They are weighted so the wire in between the two needles never kinks up while I'm working!!  Please, please try this brand out, it will change your circular knitting life!  And thank you Yarn Mart for introducing me!!

Hope you go out and try this, it is a great way to organize your needles, and it is SO simple!!

Wednesday, November 30, 2011

 Something I have been thinking of doing lately is getting another chair specifically for my craft desk.  Currently, I have just been moving the chair over from the computer desk every time I want to sit and craft.  I decided that I would just keep my eye out for a good chair.  It just so happened that I came across a nice office chair for $7 at my local GoodWill store here in Bryant.  I immediately snatched that puppy up.  It was a little dingy, so I decided to put some new fabric on!!


So here is the chair before I did anything.  Like I said, kind of dingy.  Usually you can just unscrew the seat and the seat back, and so that is what I did!!  The seat back has a black plastic covering on the back side of it, and once it was unscrewed the plastic part just popped right off.  Now, you could spend the time taking all of the staples out and removing the old fabric, but I decided just to staple my new fabric right over it.  I cut the fabric so there was about 2 inches of overhang around all four sides.  


Starting with the long sides and keeping the fabric taught, I began stapling with my handy dandy staple gun.  I used quarter inch staples.  You want to keep the fabric taught, but not really tight because it could cause the fabric to ripple.  Think of trying to fit yourself in to too skinny jeans and the ripple effect across the front. Don't want any of that going on.  Anyways, as you go around the corners, make little pleats.  This will make sure that the fabric stays smooth around the edges.  


Here is the finished beauty!!  I absolutely love it, and I think it fits in just perfect!  Now go out and try your own!!
 

Copyright 2010 unRuffled.

Theme by WordpressCenter.com.
Blogger Template by Beta Templates.