Saturday, September 24, 2011

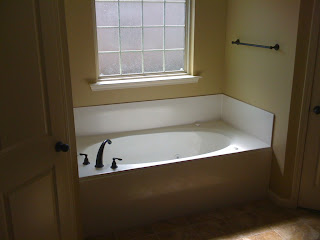
Well, as I was talking about in my previous post, all of the walls in our house are pretty....blah.  Well, I take that back.  They serve as a great blank canvas to decorate!! My latest project? The boring bathroom.  We have such a great big tub that hangs out in between his and hers closets.  I love it, but like I said, it just looked so boring.  So I started thinking about what would make this part of the house unique.  And what do you think of when you are taking a bath?? BUBBLES!!  That thought somehow made me get in my car and I automatically drove to Michaels (funny how my hands just know the way...I could get there in my sleep).  


I was wondering what I could do to make some rocking bubbles around the tub.  I knew I would probably use a pen of some sort, and paint pens just seemed right.  I decided to get a gold color.  I wanted the design to be bold, but not overwhelming.  I thought that the gold would just stand out enough against the "golden wheat" colored walls.  I was thinking of either cutting out circles from cardstock, or tracing around bowls and cups to get what I wanted.  Then, while wandering through the painting/drawing section of Michaels, I came across this circle drawing template.  How perfect was this find??  It has 13 different sizes of circles, and it is made out of a heavier plastic so it wouldn't get ruined like cardstock would!  I was a little nervous that the paint would seep under, so I got ready armed with a toilet paper roll to wipe away excess as needed.  


I started off on one side of the window, and all I really did was trace random circles!!  I'm glad that I got two of the paint pens, because the first one that I used was very messed up and blotted the paint every where.  I decided to open the other pen and see how it worked.  It was much better, and in fact, the paint didn't even seep under the template!  Also, the paint dried very quickly, so I didn't have to wait at all before moving to the next circle, even if it was right next to the one I just painted.  


After I got the hang of it, the project went pretty quickly.  I wanted to give the illusion that the bubbles were coming up and spilling out of the tub.  I think I accomplished that pretty well!!  Sorry about the color of the picture...my iPhone seemed to turn it slightly green.  I may need to look in to that.....


Here it is finished!! Now I just need to figure out a cute way to arrange my candles.  I love orange and I got those tea lights as a wedding gift.  And they smell like mango.  Yumm.  I'm sure I will be able to find a way to use them! Here is the cost break down for this project:
Gold Paint Pens - $1.99 (x2, so around $4)
Circle Drawing Template - $5 (plus 40% off coupon, so around $3)
Total - around seven dollars!

Now go make a boring room in your house a little more bubbly!

Sunday, September 18, 2011

In keeping with true craft-addiction form, I was looking at blogs last night while Tim got some Call of Duty time in.  Don't ask me how I came across this, but Lindsay over at Fine Things and Big Dreams is a genius.  She posts everything and anything you could ever want to do to makeover a space, inside or outside of your home.  I happened to come across one of her posts where she was redecorating one of her spare bedrooms.  I just thought it was absolutely brilliant, and thought to myself, "hey, I could actually do something like that!!"  So, without Tim's approval (I didn't really give him the chance to object...) I started my big master bedroom project.  At 11:30 pm.  Good choices.  Anyways, the only issue that happened was that I put a huge scratch in my brand new craft desk while cutting the piece of cardboard.  

I started with an 11x14 piece of cardboard, just like Lindsay said to do in her post.  Apparently I'm not the best at cutting perfect edges.  My cardboard pieces was more of a......trapezoid.  But you know what? At midnight I wasn't really caring too much about that! I also made marks three inches in on all sides so that I knew where I wanted my squares to overlap.  So off I went to the bedroom to start tracing.  I would suggest that anyone trying this would make sure your first trace was level....might save you some trouble later.  But I just went ahead and started tracing (like I said...kind of late to start a project like that).


After tracing the cardboard over and over......and over, I went to bed.  When I woke up and saw that wall I was actually pretty appalled at what I had done.  It came out looking like a complete mess.  The squares were running in all different directions, none were level, and it just looked awful.  But I knew there was hope.  I had seen someone using a laser level on a HGTV show, so I looked in to buying one.  There are different price points, and (hindsight being 20/20) I would suggest not going for the cheap, or even the medium priced one.  I had to run to Lowes anyways to get some painters tape, a drop cloth, and a paint roller, so i decided to pick a laser level up too.  


Let me tell you, that laser level was a pain in my.....well you know what.  First of all, the only way to mount it to your wall is by sticking the pin in the back of it into the drywall.  Um, no.  I was not going to go through all of that trouble doing this painting to have a whole bunch of holes in it!!!  Luckily I had some double sided adhesive squares that fit on the back, and were strong enough to hold it to the wall.  Second problem that I encountered is that it is NOT level!!!!  When I lined it up so that it was supposedly level, the laser line when at about a 15 degree angle up.  That just wasn't going to work for me.  With Tim's help I made the line what we thought was most level, and I just went with it.  The lines that I had drawn the night before did not match up with the level AT ALL.  So, I just tried to eyeball as best as I could, making sure the tape lined up with the laser line.  The horizontal tape lines were all 13 inches, two inches wider than the original cardboard.  I did this so that when I made the squares, I could match up the corners of the tape and make sharp corners.  I did the same with the vertical lines, which I cut at 16 inches.  


The cutting was probably the most tedious part of the project.  I wanted to make sure that the squares turned out to be as close to the same size as possible.  I know there are a few "fudges" here and there, but really, no one will notice like I did.  I did all of the horizontal lines first using the laser level.  After that, I went through and completed the squares with the longer pieces of tape.  I did that so that I could work from one end of the wall to the other.  


Taping the whole wall took a good 3 hours.  It is definitely worth taking time to line everything up though, makes things in the end much easier with less touch-ups to do.  Lindsay said she had to take a few wine breaks.....luckily I made it through with one bowl of cereal and one bottle of Mountain Dew.  And, luckily there was a Law and Order: SVU marathon on which kept my ears occupied!!


The next step I think is crucial.  Lindsay skipped it, and she said she regretted it, so I made sure that I did it!!  After I got everything taped up, I took the original wall color paint and painted over all of the blue painters tape.  If you have ever done a painting project you know no matter how hard you press down, the paint will still leak in!!  With a huge project like this, I thought it was imperative that I take time for this step.  And it didn't take too long because it doesn't have to be very precise as long as you get all of the tape covered.  What this does is "seal" the tape.  Wherever the paint will leak through to the wall, the original color seeps in.  That way, when you start painting with your second color, you will come out with nice clean lines.  


After two coats of the white and lots of drying time, I was ready to pull off the tape.  Depending on what color you had and what color you are painting, you may need more coats to cover evenly.  Okay...so 1...2....3....hold your breath....and start pulling!!  This turned out absolutely awesome.  Of course there are spots that need to be touched up, but let it dry overnight and go back and touch up.  I personally feel like I deserve a break for tonight, the project took me from 11-7 today!!  But it is totally worth it, it turned out amazing, and looks great in our bedroom.  


Because we had a newly built house, every wall in the house is the same color, and all of the trim is the same color.  The builder left us extra paint in the attic, so I didn't have to buy any at all.  And, because I used the same color as the trim for the wall color, I didn't have to worry about taping up the trim which just cuts out one step.  So, cost break down:
2 rolls of 1" painters tape - $10
Drop cloth - $4
New roller and paint holder - $10
Paint in attic - free
Laser Leveler - $35 (but I am promptly returning it tomorrow, so free)
Cost of project - $24

I think it was worth all of the time I put in to this project.  It turned out so great!!  I was so glad to be inspired, and hope that by writing of my experience, I can inspire someone else!  Geometric patterns are very in right now, so grab your paint and brush, and get going!
Tuesday, September 13, 2011


So, here is my first review of a product I got at the EK Success Fork and Talk!!


This just happened to be the first thing that I pulled out of my EK Success goody bag.  Its like it was calling my name, waiting for me to review it.  It was super easy to use, in fact the hardest part was figuring out how to unlock the punch.


In case you can't figure it out either, there is a little pink slider on the bottom.  You need to slide it towards the bottom of the punch. Mine was pretty tough to get undone, but you will get it, I promise!!


Okay so here is how you start.  Take a sheet of 12 x 12 and insert in to the punch.  There is a little black mark....see it there?  Line your paper up and give it a punch!

It makes a cute little row of four petals.
Slide the petals over and line them up with the print on the punch.  This helps make sure you will have evenly spaced petals all the way across.


Keep punching until you get all the way across the page.  Punch as many strips as you'd like, the more you punch, the fuller your flowers will look in the end.


For this flower I did three different colors.


You can use some glue to layer the strips.  If you overlap the petals/spaces between, it again helps to make the flower seem more full.


Then, take a pencil, pen, anything really, and roll the strips up.

I used tacky glue to secure the end to the roll.  I love tacky glue.

After the glue has dried, fold the petals back as far as you want to open up your flower.  Start with the outside of the flower and work to the inside.  It is really easy and I promise the flower will take shape.


And, drum roll please......!
Here is my finished flower!!
Can't wait to make some more, might even make a door hanging for fall! So many ideas!

When I was younger, my mom surprised me with a bedroom makeover.  Part of the makeover was painting the mirror in my room from white to orange.  I absolutely loved it, and it came with me to my condo through college.  It matched perfectly with all of the orange decorations in my condo, and of course the two walls I painted orange (much to my dads dismay).  It is a great mirror, and I decided it would be perfect to put over our mantle in the living room (since there wasn't anything there yet).  However, the orange just didn't fit in with the rest of the decor, and I'm pretty sure Tim doesn't like orange as much as I do!


Here is the pretty orange before I started painting.  I'm not going to lie, I was sad to see it go.  But I was excited about the new color.  Instead of buying a huge amount of paint, I opted to buy one of the sample sized paints and see how far it went.  I actually used only half of it, and it only cost me $2.50.  The color that I chose was closer to a red that is in the area rug in the living room.  


It now is hanging above our mantle with some of my favorite little items.  The crystal vase and the couple in an embrace were both wedding presents.  The little angel playing the flute was a Christmas present from my mom.  I used to play flute all the time so that really meant a lot to me.  The statues are both made by the same people and are called WillowTree.  


To the left of the mirror sit my little collection of owls.  I started liking owls when I joined my sorority, Chi Omega.  They really have a lot of meaning behind them, and even though I am not involved much in my sorority anymore, I still like the owl!  The big one is a find from Hobby Lobby, the multi-color one is a gift from my mom from her trip to New Orleans, and the stone owl is from my good friend M from when she went on a cruise.  The vases say laugh and hope, which are always good reminders.  


Here is the finished project!!  I think it came together very well, and there is finally something covering all of that blank wall!!
Today I went on an adventure to the Habitat for Humanity ReStore in Benton (check them out at http://www.habitatsalinecounty.com/).  It is such a great little place to go in to, and everything there is donated and in pretty good shape.  All of the money goes towards building new homes for families in Saline County.  I found some great deals, and took advantage of their sale going on: put whatever you want in to a plastic grocery sack, and as long as it closes at the register, you get the entire bag for $2.00!!  I found lots of little goodies, including a glass candle stick and a plate that I will be making a pretty little serving plate out of.  Note: hot glue does not work to attach glass to ceramic (lesson learned, off to get glass specific super glue tomorrow!).  I also got two ceramic soup bowls with lids.  Unfortunately, one of them had a run in with my tile floor in the kitchen already, so I guess I will only have one to use.  I also found two cute shelves.  One I will use in my craft room closet, and pictures will come after it gets a couple of coats of paint.  The other I hung in my living room to display some of my favorite treasures from the wedding.  


I'm debating whether or not to paint it, but I think I like it the way it is.  I was going to paint it the same color as the trim throughout the house, but I'm having second thoughts now that I see it on the wall.  The bottom center you can see the two figurines that were our cake toppers.  The man, of course, has a golf bag, and the woman has a nurses hat on (medical field, close enough).  On the left shelf there are two vintage salt and pepper shakers that are painted like slot machines and show the old downtown Vegas.  On the right shelf there is a little bell that I got right before we left to come home, and the top G I found at Michaels for $1.50!


This picture shows the whole wall.  To the left is a canvas print of a picture that I had made just recently.  It is of Tim and I and both of our parents inside the wedding chapel right after we were married.  I think they all go together nicely, and I prefer it much more than just the blank wall.  Of course Macy was there to supervise the whole project!!

Monday, September 12, 2011


Ok.  So my current obsession is craftgossip.  I've talked about it before.  It is this wonderful blog that links to other wonderful blogs.  And, as I learned, they are an international site, and their headquarters are in Australia.  However, 4 of their editors live right here in Central Arkansas!!!  They got a luncheon together sponsored by EK Success, which is a great crafting company.  I really thought that they just did paper.  Boy, was I wrong.  At the end of the luncheon we got a giant goody bag of tons of EK Success brand items to try out!!  Now we get to try all of them out and blog about how awesome they are.  So that means that there will be a lot of posts about the new stuff I get to try....because there is so much it will take me forever to get through all of them!!!  It is fun though, and now I have lots of stuff to fill my craft room with (even though it is already pretty full...).  So, since I haven't been able to try anything yet (I've been in bed with a stomach bug all day) I decided I would blog about the actual event on Saturday, September 10.


So the first Fork and Talk was at Trio's restaurant in Little Rock.  Such a good place to eat.  You really need to go there.  We were in a room by ourselves and had a special menu to pick from for lunch.  There were four tables set up, and we got to pick where we sat!  There were five people plus one of the editors at each table.  First things first, we got lunch!!


 I got the Leilani for lunch which was this wonderful croissant with appricot jam, dried cranberries, turkey and avocado.  There was also a fruit salad with poppyseed dressing......it was SO good!!!  I wish we could have had seconds....but there was crafting to be done!!


We went around the room and told everybody about ourselves, what we blogged about and what the strangest thing we ever crafted with was.  I believe this picture is me explaining that I am way to OCD to craft with anything else besides what is made to craft with.  I guess that doesn't make me very creative....but what can I say.  The weirdest I heard was using tampons to apply chalk, and knitting with--wait for it--collected dog hair.  Blech.  Couldn't even imagine.  


Not the best picture of me.  But you can see behind me some of the goodies we get to play with in a little bit!!!


After we finished eating we had a challenge to decorate a hat within fifteen minutes with our table.  We got right to work and ours was a beautiful hat with pink sparkle ribbon, a big tulle bow, and a little bouquet of flowers in the back!!  We didn't win....super depressing.  But I thought we were awesome.  


So EK Success has these little kits that they put together.  I think they are pretty awesome.  Because I like things already ready to go....everything you need is in these little kits.  The ones we were trying out today was to make these flower barrettes or pins.  It has the fabric, the felt, the barrettes, and even a needle and thread!! The only other thing you need for this project is a hot glue gun (we used glue dots and they worked just fine). It was super simple and I loved making them!!!


 Here we are showing off our cute new flowers.  Funny story: Andi, who is on the right, was in school with me at UAMS! I haven't seen her in so long, how funny to come across her at this random event!!!!  


After we did our flowers we finally got to dive in to our goody bags.  And let me tell you, those things were PACKED full of goodies!!!!  In fact, there was so much stuff, that we got an additional grocery bag full of stuff!!  We got to look through and see all of the stuff we were going to get to take home with us!!


I'm pretty sure the things I am most excited about are the Martha Stewart Craft supplies.  I am a big fan of Martha.  


Okay.  Seriously.  We got mustache stickers.  Doesn't get any better than that.  


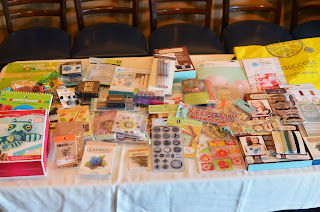
This is everything laid out so that you can see how many things we actually got!!! Can you believe it?? We are so lucky, and EK Success was a great sponsor for providing all of this to us!! I seriously can't wait to try every thing out!


This is a picture of all of the ladies that were at the event.  I am so excited that I got to meet all of them.  They all had such amazing stories, and I feel like I made so many friends who I have crafting in common with!  I can't wait to keep up with their blogs, and maybe meet again someday for more lunch and crafting!!!

After the lunch was over, I headed over to meet Tim for some tailgating.  He had been golfing all morning, and we got finished at the same time.  We had a blast seeing all of our friends!! Only thing I didn't like? I got beer poured on me.....twice....by two different people.  Oh well. I guess that is what happens!! 


Tim and I got tickets to the game from his uncle (thanks!!).  They did something really cool this year.  They had all of the people in the even sections wear red, and all of the people in the odd sections wear white.  The student section was given blue shirts.  We were sitting in section 19, so we dressed in white!!  


The stadium looked awesome, and I think it was such a great way to honor our country and the anniversary of September 11th.  I feel so blessed to live in the country that I do, the land of the free, and the home of the brave.


Oh...and GO HOGS! We won!!


Saturday, September 3, 2011

Well, I have decided to start a month long scrapbooking class called Learn Something New Every Day by this fabulous woman named Shimelle.  She is in England, and it is an online class.  I have gotten the pleasure of "meeting" other scrapbookers from all over the world.  The point of the class is to be aware of little lessons that you come across all day, and then scrap it!  Now, I am not the most creative scrapbooker in the entire world.  In fact, I feel pretty inadequate compared to the other ladies that are sharing their posts in the class.  But it also gives me a lot of inspiration, and hopefully I can learn from their pictures and only get better!  We started by getting our album ready.  I used a small 6x6 album that I bought probably five years ago on sale, and it has been sitting in my scrapbook bin since then.  Then, using a lot of other little bits from my stash, this is what I got.  


So now, every day, I get this wonderful email from Shimelle.  She sends us email prompts to get us thinking about what lessons we should be encountering that day.  We can either follow that prompt, or just go with a lesson that stands out with us that day.  The first day of September, I was working.  You know, I have found that working in the hospital, some coworkers lose their....feelings?  I don't know if that is the correct way to put it.  But all day long we tend to work with difficult patients.  There was one in particular that people had mentioned was difficult. I didn't know what to think when I walked in the room.  I tried to get them talking about themselves, and before I knew it I had been in the room for 45 minutes.  The patient thanked me profusely, stating that I had made them feel much better.  That is when I learned that sometimes, people just need someone to talk to.  


I had a rough day on Friday.  I don't really want to get in to all of the details, so I will just share with you the lesson that I learned.  Not only did my boss help me to learn this lesson, but also my wonderful coworkers.  I learned that I shouldn't let another person's insecurities affect the confidence that I have in myself.  This is very important in the field that I work in, because I have to be confident in the knowledge that I have when I am working with patients.  


Today was a very lazy day, as most Saturdays are when I am not working.  So when I finally woke up and read Shimelle's prompt, I knew that lesson I had already learned.  The longer that I lay in bed, the harder it is to get my feet on the floor.  When I have to work, I am on my feet by about 5:45 in the morning.  I shower, go to work, and don't leave work until about 6:45 at night.  Then we have dinner, play with the dogs, and I seem to stay awake just fine!  But my days off when I sleep in, it is very hard to actually get out of bed and get any housework finished.  So, I will try to get out of bed earlier and get things done!  I will be much happier and healthier if I just get out of bed and not lay around for 16 hours on my off days!


I am very excited for this class and I hope that I am able to finish it.  Right now I am writing my lessons on my phone, and then scrapping when I get home at night.  I will try to keep my blog updated with the lessons that I am learning. 
 

Copyright 2010 unRuffled.

Theme by WordpressCenter.com.
Blogger Template by Beta Templates.