Okay, so my first attempt at extreme couponing went pretty well. I ended up getting about 175 dollars worth of groceries for 45. I decided to step it up a bit for my second one which took a bit more planning. I got up at 4 this morning to make sure everything was in place for a good trip, and I was at the store at 6 when they opened. Two and a half hours later and only one mean person (checkout lady saying I couldn't do this when it was busy, to which I smiled and said "Yes ma'am thats why I got here at 6 AM"), and I got out the door feeling prety good! Here is what I got away with:
4 Large Dawn dish detergent
4 Mens Gillette body wash
16 Dole Frozen Smoothie Mixers
4 Oral B floss
4 Always thin pads
4 Tampax tampons
4 Carton Swanson Beef Broth
8 Axe body wash
4 Chest toothpaste
4 Krusteez blueberry muffin mix
6 Scotch bright dish sponges
5 Muffin tin liners
8 boxes Celestial Seasonings Tea
8 bottles Franks Hot Sauce
8 Viva paper towel rolls
8 Covergirl Lipgloss tubes
4 Covergirl Eyeshadow
76 cans assorted Campbells soup
1 gallon 2% milk
Total before coupons: $410.82
Total after coupons: $210.11
Total % savings: 48.9%
Not to bad if you ask me, and there are so many things that I bought that do not expire, so we will not need to buy again for a long time! I am pretty proud, and my stockpile is growing.
Wednesday, October 26, 2011

Thursday, October 13, 2011
Here in Arkansas, Fall has finally (in my opinion) arrived. When I get up in the mornings to go to work, I finally feel that crispness in the air. The feeling where a nice warm sweatshirt and a cup of hot tea sounds like just the right thing. Halloween is almost here, and most are putting out their decorations and gearing up for the soon to come candy raid. As I do not have any Halloween decorations, and we will not be home for aforementioned candy raid, I decided to do a fall wreath in honor of what matters most here in Arkansas: The Hogs. Now, to outsiders, it may seem strange....crazy even, the amount of attention one football team generates. I too thought it was pretty crazy when I first moved here. But there is something about those razorbacks that just gets you in the mood for football team spirit. I have thoroughly become a Hogs fan, and can't wait till we start producing our own little Godbold Quarterbacks (and maybe one ballerina).
The wreath that I made was SUPER SIMPLE. The best kind of craft if you are like me and like to sit down and finish a project in 1 hour or less. That is all this wreath took including the trip down the road to the store to get some supplies. I picked up a 14 inch foam wreath, three rolls of tulle ribbon, and a clear wreath holder for the door. I already had the chip board to make the words, but if you don't have any stop by your local Hobby Lobby, Michaels, or craft section of your local Walmart (granted it isn't one of the stores that has done away with the craft section...boo walmart....boo). Some scissors and a yard stick (or ruler) and I was ready to go!

I started by measuring out strips of the tulle and cutting them all at 18 inches. Feel free to make them any length that you want, get creative! I wanted a very uniform look for this wreath, so I made sure to measure. I counted out certain amounts for each color section because again, I was going for that uniform look. The more of one color you place together, the thicker the color block will be. Or be crazy and only use one color. Have fun with it! It is going to be on YOUR front door!!

Next step is pretty easy. Fold the tulle strip that you cut in half. Ta-da!

Bring the tulle under the foam ring with the loop coming to the center.
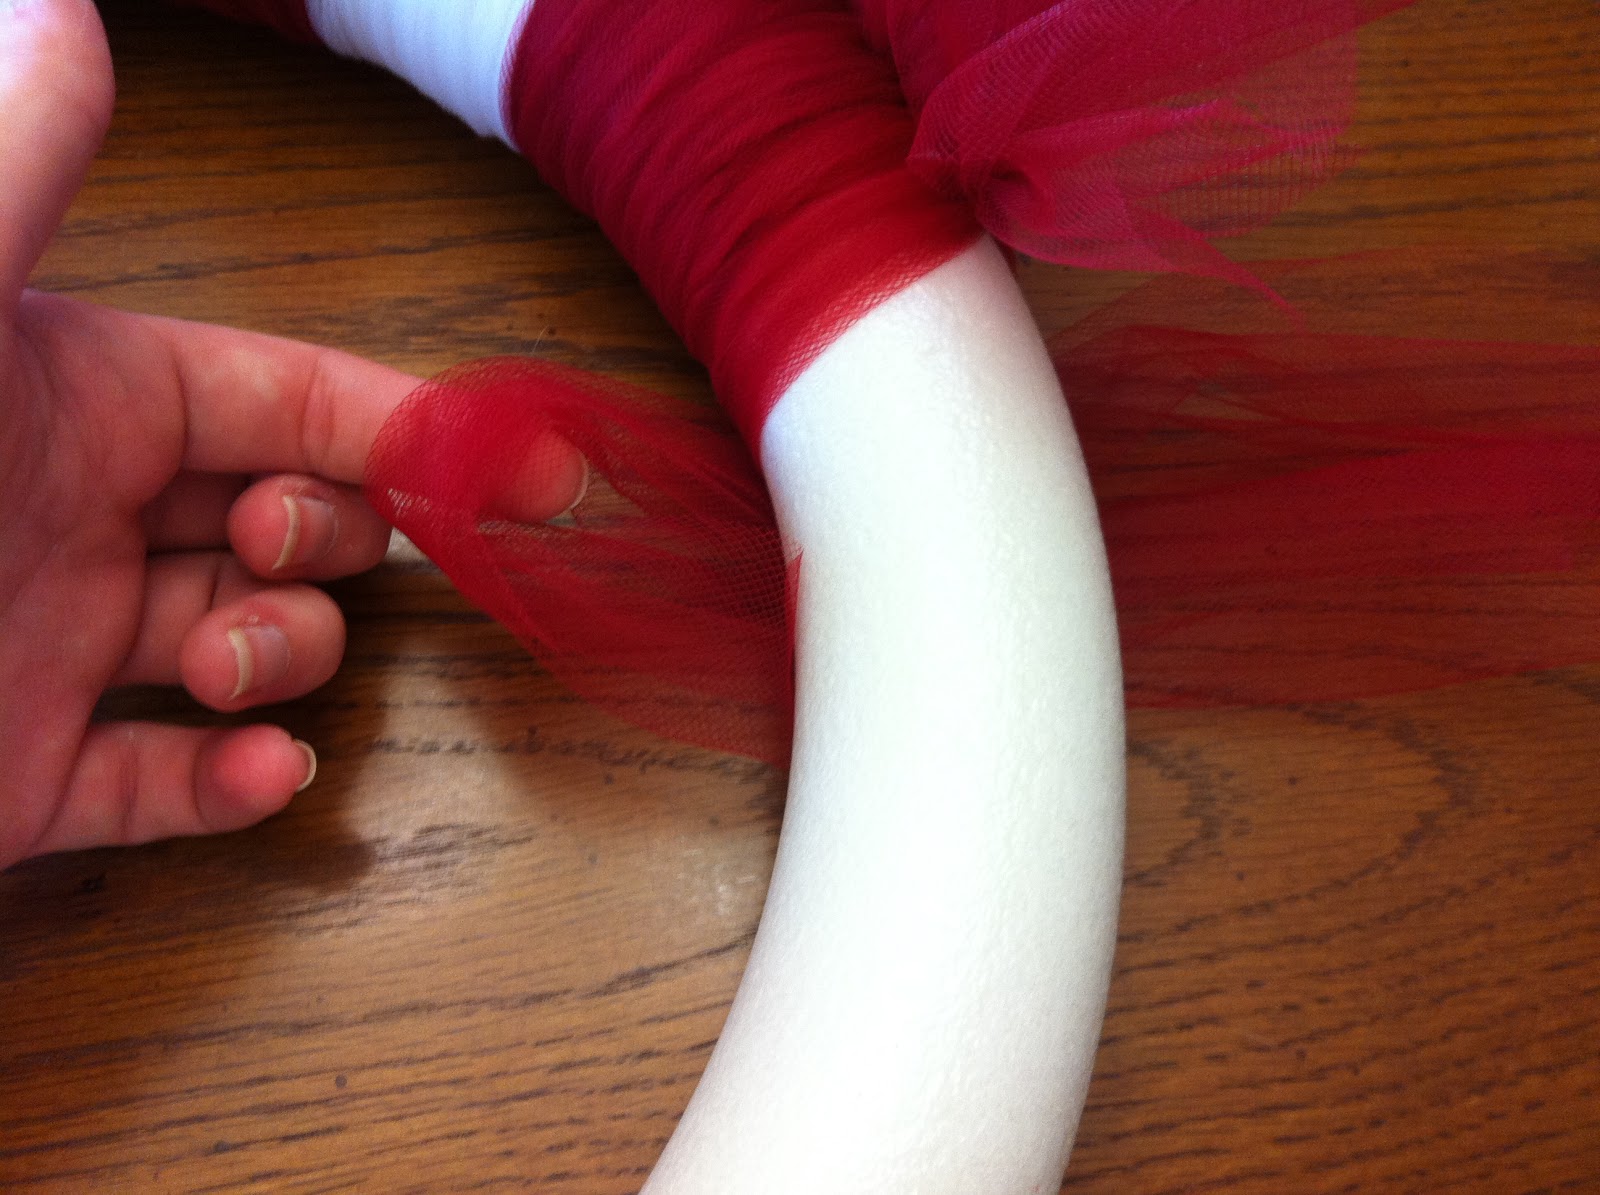
Tuck the ends of the tulle through the loop that you made when you folded it in half, and pull tight. Our front door is pretty hidden from any elements like wind, but if your door isn't I might suggest putting a dab of hot glue to secure, or even using a pin to keep everything in place.

I used the remaining tulle that I had to make a bow that I would use to hang from the hook. I geared up my handy dandy hot glue gun, got my chip board together, let it dry, and put it up!! Had a minor mishap with two of the three dogs bolting while I was making my way out the front door, so if you have escape artists like we do, watch your back...they are just waiting for their moment to run. Luckily Tim and I rounded up the pups, and the wreath was happily placed on our door.

All I have left to say is.....

Woo Pig Sooie!!
Okay all of my fab friends out there. I know you like "do-it-yourselfers" as much as I do. So imagine my surprise when I came across this wonderful company called Sweets Cosmetics. A little back story here, I went to junior high school with one of the co-creators of this business, Molly Dunkle. Far cry from OMG we were tots BFFs way back when, but I did know her and we had classes together!
So she and her business partner started this wonderful cosmetic company out of our hometown of Fort Collins, Colorado. They are all about making good for your skin cosmetics made with local products. They have a fantastic website and you should check it out (Sweets Cosmetics for those who missed the link above). They also have videos on their website promoting a Men's line including Man Balm (lip balm) and Man Bar (soap). I would totally buy these for my hubby, not sure if he would actually use them, but I'm sure there are men out there who aren't as picky about which products they use!! I am sure they have more products than listed for purchase on their site, and there is an email address you can use to contact them. They are also on Facebook, of course! I am definitely down for supporting and promoting small business owners!
Congrats girls for creating this and I wish you all the best! I can't wait to place my first order and see what all the buzz is about. I hope you go check out their website and order some sweets for yourself!
 |
| Molly Dunkle and Katie Barstow |
Congrats girls for creating this and I wish you all the best! I can't wait to place my first order and see what all the buzz is about. I hope you go check out their website and order some sweets for yourself!
Saturday, September 24, 2011
Well, as I was talking about in my previous post, all of the walls in our house are pretty....blah. Well, I take that back. They serve as a great blank canvas to decorate!! My latest project? The boring bathroom. We have such a great big tub that hangs out in between his and hers closets. I love it, but like I said, it just looked so boring. So I started thinking about what would make this part of the house unique. And what do you think of when you are taking a bath?? BUBBLES!! That thought somehow made me get in my car and I automatically drove to Michaels (funny how my hands just know the way...I could get there in my sleep).

I was wondering what I could do to make some rocking bubbles around the tub. I knew I would probably use a pen of some sort, and paint pens just seemed right. I decided to get a gold color. I wanted the design to be bold, but not overwhelming. I thought that the gold would just stand out enough against the "golden wheat" colored walls. I was thinking of either cutting out circles from cardstock, or tracing around bowls and cups to get what I wanted. Then, while wandering through the painting/drawing section of Michaels, I came across this circle drawing template. How perfect was this find?? It has 13 different sizes of circles, and it is made out of a heavier plastic so it wouldn't get ruined like cardstock would! I was a little nervous that the paint would seep under, so I got ready armed with a toilet paper roll to wipe away excess as needed.

I started off on one side of the window, and all I really did was trace random circles!! I'm glad that I got two of the paint pens, because the first one that I used was very messed up and blotted the paint every where. I decided to open the other pen and see how it worked. It was much better, and in fact, the paint didn't even seep under the template! Also, the paint dried very quickly, so I didn't have to wait at all before moving to the next circle, even if it was right next to the one I just painted.


After I got the hang of it, the project went pretty quickly. I wanted to give the illusion that the bubbles were coming up and spilling out of the tub. I think I accomplished that pretty well!! Sorry about the color of the picture...my iPhone seemed to turn it slightly green. I may need to look in to that.....

Here it is finished!! Now I just need to figure out a cute way to arrange my candles. I love orange and I got those tea lights as a wedding gift. And they smell like mango. Yumm. I'm sure I will be able to find a way to use them! Here is the cost break down for this project:
Gold Paint Pens - $1.99 (x2, so around $4)
Circle Drawing Template - $5 (plus 40% off coupon, so around $3)
Total - around seven dollars!
Now go make a boring room in your house a little more bubbly!
Sunday, September 18, 2011
In keeping with true craft-addiction form, I was looking at blogs last night while Tim got some Call of Duty time in. Don't ask me how I came across this, but Lindsay over at Fine Things and Big Dreams is a genius. She posts everything and anything you could ever want to do to makeover a space, inside or outside of your home. I happened to come across one of her posts where she was redecorating one of her spare bedrooms. I just thought it was absolutely brilliant, and thought to myself, "hey, I could actually do something like that!!" So, without Tim's approval (I didn't really give him the chance to object...) I started my big master bedroom project. At 11:30 pm. Good choices. Anyways, the only issue that happened was that I put a huge scratch in my brand new craft desk while cutting the piece of cardboard.
I started with an 11x14 piece of cardboard, just like Lindsay said to do in her post. Apparently I'm not the best at cutting perfect edges. My cardboard pieces was more of a......trapezoid. But you know what? At midnight I wasn't really caring too much about that! I also made marks three inches in on all sides so that I knew where I wanted my squares to overlap. So off I went to the bedroom to start tracing. I would suggest that anyone trying this would make sure your first trace was level....might save you some trouble later. But I just went ahead and started tracing (like I said...kind of late to start a project like that).

After tracing the cardboard over and over......and over, I went to bed. When I woke up and saw that wall I was actually pretty appalled at what I had done. It came out looking like a complete mess. The squares were running in all different directions, none were level, and it just looked awful. But I knew there was hope. I had seen someone using a laser level on a HGTV show, so I looked in to buying one. There are different price points, and (hindsight being 20/20) I would suggest not going for the cheap, or even the medium priced one. I had to run to Lowes anyways to get some painters tape, a drop cloth, and a paint roller, so i decided to pick a laser level up too.

Let me tell you, that laser level was a pain in my.....well you know what. First of all, the only way to mount it to your wall is by sticking the pin in the back of it into the drywall. Um, no. I was not going to go through all of that trouble doing this painting to have a whole bunch of holes in it!!! Luckily I had some double sided adhesive squares that fit on the back, and were strong enough to hold it to the wall. Second problem that I encountered is that it is NOT level!!!! When I lined it up so that it was supposedly level, the laser line when at about a 15 degree angle up. That just wasn't going to work for me. With Tim's help I made the line what we thought was most level, and I just went with it. The lines that I had drawn the night before did not match up with the level AT ALL. So, I just tried to eyeball as best as I could, making sure the tape lined up with the laser line. The horizontal tape lines were all 13 inches, two inches wider than the original cardboard. I did this so that when I made the squares, I could match up the corners of the tape and make sharp corners. I did the same with the vertical lines, which I cut at 16 inches.

The cutting was probably the most tedious part of the project. I wanted to make sure that the squares turned out to be as close to the same size as possible. I know there are a few "fudges" here and there, but really, no one will notice like I did. I did all of the horizontal lines first using the laser level. After that, I went through and completed the squares with the longer pieces of tape. I did that so that I could work from one end of the wall to the other.

Taping the whole wall took a good 3 hours. It is definitely worth taking time to line everything up though, makes things in the end much easier with less touch-ups to do. Lindsay said she had to take a few wine breaks.....luckily I made it through with one bowl of cereal and one bottle of Mountain Dew. And, luckily there was a Law and Order: SVU marathon on which kept my ears occupied!!

The next step I think is crucial. Lindsay skipped it, and she said she regretted it, so I made sure that I did it!! After I got everything taped up, I took the original wall color paint and painted over all of the blue painters tape. If you have ever done a painting project you know no matter how hard you press down, the paint will still leak in!! With a huge project like this, I thought it was imperative that I take time for this step. And it didn't take too long because it doesn't have to be very precise as long as you get all of the tape covered. What this does is "seal" the tape. Wherever the paint will leak through to the wall, the original color seeps in. That way, when you start painting with your second color, you will come out with nice clean lines.

After two coats of the white and lots of drying time, I was ready to pull off the tape. Depending on what color you had and what color you are painting, you may need more coats to cover evenly. Okay...so 1...2....3....hold your breath....and start pulling!! This turned out absolutely awesome. Of course there are spots that need to be touched up, but let it dry overnight and go back and touch up. I personally feel like I deserve a break for tonight, the project took me from 11-7 today!! But it is totally worth it, it turned out amazing, and looks great in our bedroom.

Because we had a newly built house, every wall in the house is the same color, and all of the trim is the same color. The builder left us extra paint in the attic, so I didn't have to buy any at all. And, because I used the same color as the trim for the wall color, I didn't have to worry about taping up the trim which just cuts out one step. So, cost break down:
2 rolls of 1" painters tape - $10
Drop cloth - $4
New roller and paint holder - $10
Paint in attic - free
Laser Leveler - $35 (but I am promptly returning it tomorrow, so free)
Cost of project - $24
I think it was worth all of the time I put in to this project. It turned out so great!! I was so glad to be inspired, and hope that by writing of my experience, I can inspire someone else! Geometric patterns are very in right now, so grab your paint and brush, and get going!
Tuesday, September 13, 2011

So, here is my first review of a product I got at the EK Success Fork and Talk!!

In case you can't figure it out either, there is a little pink slider on the bottom. You need to slide it towards the bottom of the punch. Mine was pretty tough to get undone, but you will get it, I promise!!


Okay so here is how you start. Take a sheet of 12 x 12 and insert in to the punch. There is a little black mark....see it there? Line your paper up and give it a punch!
It makes a cute little row of four petals.


Keep punching until you get all the way across the page. Punch as many strips as you'd like, the more you punch, the fuller your flowers will look in the end.
For this flower I did three different colors.

You can use some glue to layer the strips. If you overlap the petals/spaces between, it again helps to make the flower seem more full.


Then, take a pencil, pen, anything really, and roll the strips up.
I used tacky glue to secure the end to the roll. I love tacky glue.
After the glue has dried, fold the petals back as far as you want to open up your flower. Start with the outside of the flower and work to the inside. It is really easy and I promise the flower will take shape.
And, drum roll please......!
Here is my finished flower!!
Can't wait to make some more, might even make a door hanging for fall! So many ideas!

When I was younger, my mom surprised me with a bedroom makeover. Part of the makeover was painting the mirror in my room from white to orange. I absolutely loved it, and it came with me to my condo through college. It matched perfectly with all of the orange decorations in my condo, and of course the two walls I painted orange (much to my dads dismay). It is a great mirror, and I decided it would be perfect to put over our mantle in the living room (since there wasn't anything there yet). However, the orange just didn't fit in with the rest of the decor, and I'm pretty sure Tim doesn't like orange as much as I do!

Here is the pretty orange before I started painting. I'm not going to lie, I was sad to see it go. But I was excited about the new color. Instead of buying a huge amount of paint, I opted to buy one of the sample sized paints and see how far it went. I actually used only half of it, and it only cost me $2.50. The color that I chose was closer to a red that is in the area rug in the living room.

It now is hanging above our mantle with some of my favorite little items. The crystal vase and the couple in an embrace were both wedding presents. The little angel playing the flute was a Christmas present from my mom. I used to play flute all the time so that really meant a lot to me. The statues are both made by the same people and are called WillowTree.

To the left of the mirror sit my little collection of owls. I started liking owls when I joined my sorority, Chi Omega. They really have a lot of meaning behind them, and even though I am not involved much in my sorority anymore, I still like the owl! The big one is a find from Hobby Lobby, the multi-color one is a gift from my mom from her trip to New Orleans, and the stone owl is from my good friend M from when she went on a cruise. The vases say laugh and hope, which are always good reminders.

Here is the finished project!! I think it came together very well, and there is finally something covering all of that blank wall!!
Subscribe to:
Posts (Atom)